Getting Started with OneLibro
This guide will help you set up OneLibro locally for development.
Prerequisites
Before you begin, ensure you have:
- Node.js 20+ (LTS recommended, v20.19+ tested)
- npm 10+ or yarn package manager
- Git for version control
- Supabase Account (free tier works)
- Plaid Account (sandbox is free)
- Resend Account (free tier: 100 emails/day, 3,000/month)
- Code Editor (VS Code recommended)
Quick Start (5 minutes)
1. Clone the Repository
git clone https://github.com/Yatheesh-Nagella/yatheesh-portfolio.git
cd yatheesh-portfolio
2. Install Dependencies
npm install
3. Set Up Environment Variables
Create a .env file in the root directory:
cp .env.example .env
Fill in the following required variables:
# Supabase Configuration
NEXT_PUBLIC_SUPABASE_URL=https://your-project.supabase.co
NEXT_PUBLIC_SUPABASE_ANON_KEY=your-anon-key
SUPABASE_SERVICE_ROLE_KEY=your-service-role-key

# Plaid Configuration
PLAID_CLIENT_ID=your-plaid-client-id
PLAID_SECRET=your-plaid-sandbox-secret
PLAID_ENV=sandbox

# Security
ENCRYPTION_KEY=your-64-character-hex-key

# Email (Resend)
RESEND_API_KEY=re_your-api-key

# Optional: Admin 2FA
ADMIN_TOTP_ISSUER=OneLibro Admin

# Optional: Cron Job Security
CRON_SECRET=your-random-secret-string
Generate encryption key:
# On Linux/Mac
openssl rand -hex 32

# On Windows (PowerShell)
-join ((48..57) + (97..102) | Get-Random -Count 64 | % {[char]$_})
4. Set Up Supabase Database
Option A: Using Supabase Dashboard
- Create a new project at supabase.com
- Go to SQL Editor
- Run the migration files from
supabase/migrations/in order
Option B: Using Supabase CLI
npx supabase db push
5. Run Development Server
npm run dev
Visit:
- Main Portfolio: http://localhost:3000
- Finance App: http://finance.localhost:3000
- Admin Dashboard: http://admin.localhost:3000
Detailed Setup
Supabase Setup
1. Create Supabase Project
- Go to supabase.com
- Click "New Project"
- Choose organization and region
- Set a strong database password (save it!)
- Wait for project to initialize (~2 minutes)
2. Get API Keys
- Go to Settings → API
- Copy:
- Project URL →
NEXT_PUBLIC_SUPABASE_URL - anon/public key →
NEXT_PUBLIC_SUPABASE_ANON_KEY - service_role key →
SUPABASE_SERVICE_ROLE_KEY⚠️ Keep secret!
- Project URL →
3. Run Database Migrations
Go to SQL Editor and run each migration file:
-- File: supabase/migrations/001_initial_schema.sql
-- Copy and paste the contents, then click "Run"
Migrations to run in order:
001_initial_schema.sql- Core tables (users, accounts, transactions, budgets)002_rls_policies.sql- Row Level Security policies003_admin_tables.sql- Admin system (admin_users, admin_sessions, audit_logs)004_functions.sql- Database functions and helpers005_triggers.sql- Automated triggers (timestamps, etc.)006_email_system.sql- Email system (templates, logs, campaigns, notification_preferences)007_invite_requests.sql- Invite code request system
4. Verify Database Setup
Run this query to check tables:
SELECT table_name
FROM information_schema.tables
WHERE table_schema = 'public';
You should see:
- users
- invite_codes
- plaid_items
- accounts
- transactions
- budgets
- admin_users
- admin_sessions
- admin_audit_logs
- notification_preferences
- email_templates
- email_logs
- email_campaigns
- budget_alert_history
- invite_code_requests
Plaid Setup
1. Create Plaid Account
- Go to plaid.com
- Sign up for free Development account
- Verify email
- Complete onboarding
2. Get API Credentials
- Go to Dashboard → Team Settings → Keys
- Copy:
- Client ID →
PLAID_CLIENT_ID - Sandbox secret →
PLAID_SECRET
- Client ID →
- Set
PLAID_ENV=sandbox
3. Configure Allowed Redirect URIs
In Plaid Dashboard → API:
- Add:
http://localhost:3000 - Add:
http://finance.localhost:3000 - Add:
https://finance.yourdomain.com(for production)
4. Test Plaid Sandbox
Sandbox test credentials:
- Username:
user_good - Password:
pass_good - MFA:
1234(if prompted)
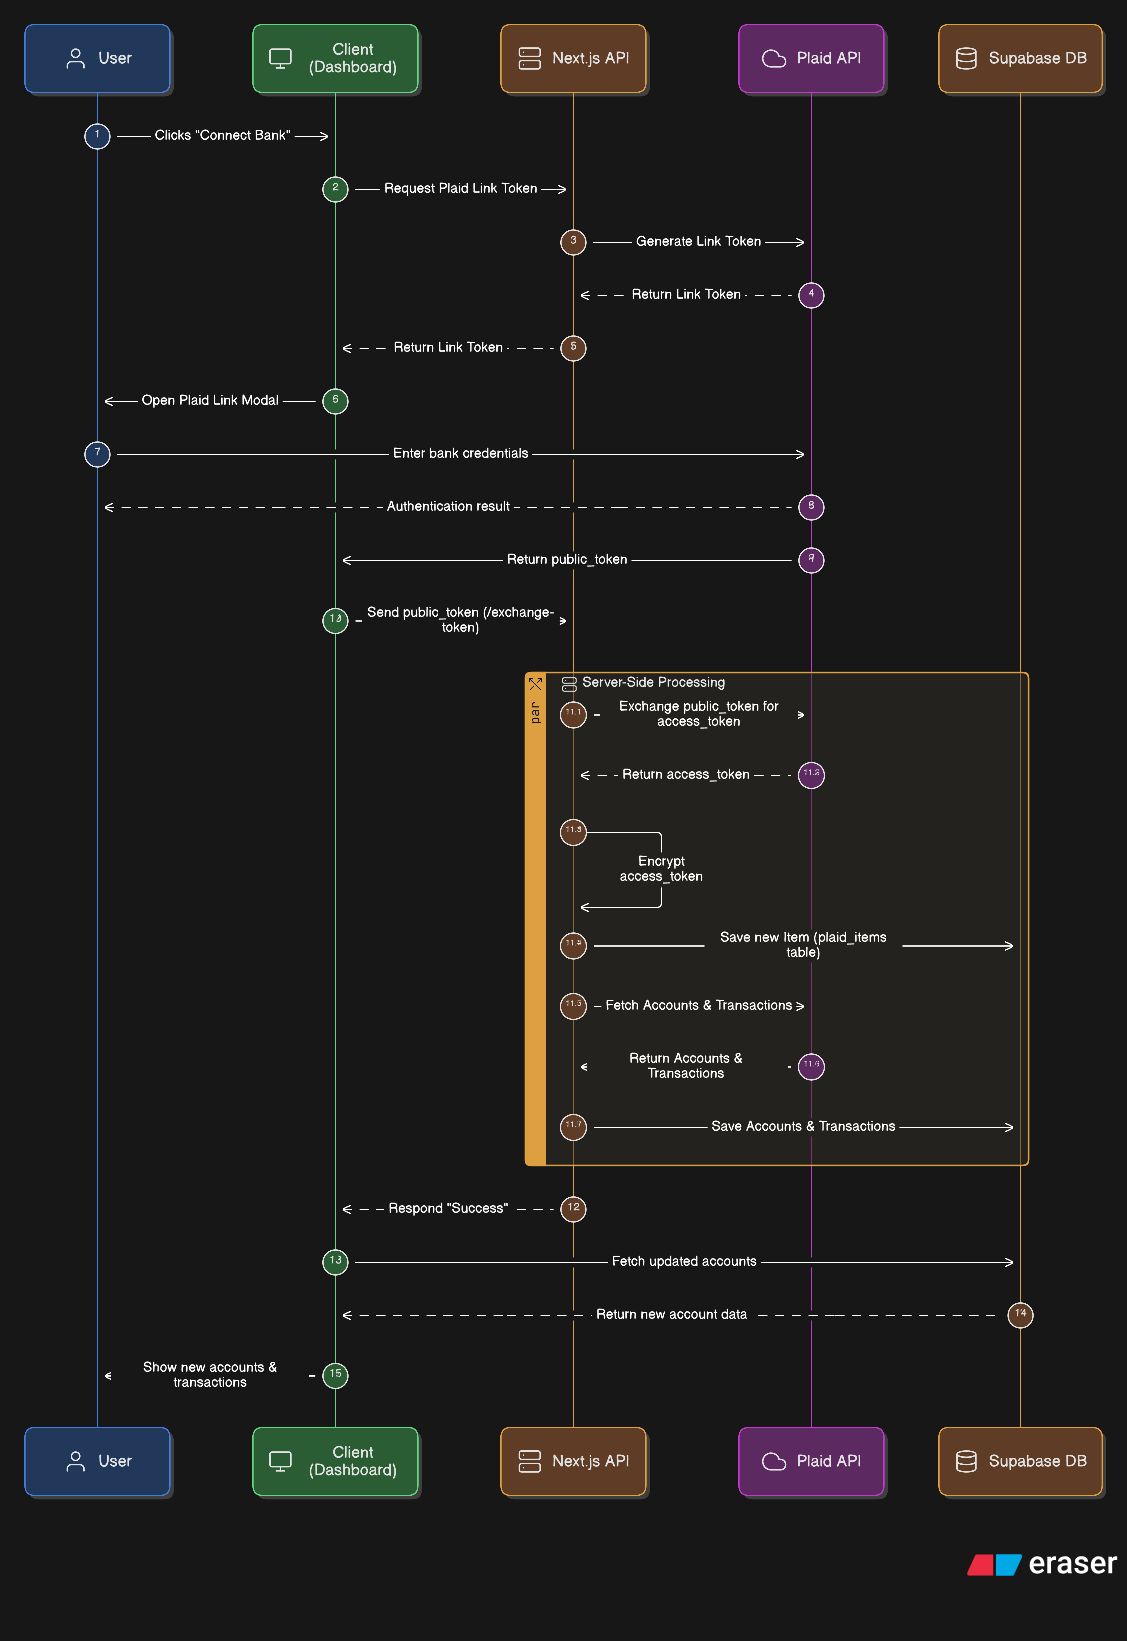
See Plaid Integration Guide for more testing scenarios.
Resend Setup
1. Create Resend Account
- Go to resend.com
- Sign up for free account
- Verify email
- Free tier includes: 100 emails/day, 3,000/month
2. Get API Key
- Go to Dashboard → API Keys
- Click "Create API Key"
- Name: "OneLibro Development"
- Copy the key →
RESEND_API_KEY - ⚠️ Save immediately - key shown only once!
3. Verify Domain (Production Only)
For production, verify your sending domain:
- Go to Domains → Add Domain
- Enter your domain (e.g.,
yatheeshnagella.com) - Add DNS records:
- SPF record
- DKIM record
- DMARC record (optional but recommended)
- Wait for verification (~5-10 minutes)
- Once verified, emails will come from
noreply@yourdomain.com
Development: Use Resend's test mode, no domain verification needed.
4. Test Email Sending
curl -X POST https://api.resend.com/emails \
  -H "Authorization: Bearer your-api-key" \
  -H "Content-Type: application/json" \
  -d '{
    "from": "onboarding@resend.dev",
    "to": "your-email@example.com",
    "subject": "Test from OneLibro",
    "html": "<p>Email works!</p>"
  }'
Environment Variables Explained
Required Variables
# Supabase - Database and Authentication
NEXT_PUBLIC_SUPABASE_URL=https://xxxxx.supabase.co
NEXT_PUBLIC_SUPABASE_ANON_KEY=eyJxxx...  # Public key (safe for client)
SUPABASE_SERVICE_ROLE_KEY=eyJxxx...      # Admin key (server-side only!)

# Plaid - Banking Integration
PLAID_CLIENT_ID=abc123...                # Your Plaid client ID
PLAID_SECRET=xxx...                      # Sandbox/Development/Production secret
PLAID_ENV=sandbox                        # sandbox | development | production

# Security - Encryption
ENCRYPTION_KEY=64-character-hex-string   # For encrypting Plaid access tokens
Optional Variables
# Plaid Sandbox Testing
PLAID_USER_NAME=user_good               # Sandbox username
PLAID_PWD=pass_good                     # Sandbox password

# Google Analytics
NEXT_PUBLIC_GA_MEASUREMENT_ID=G-XXXXXXX

# Feature Flags
NEXT_PUBLIC_ENABLE_EMAIL_CAMPAIGNS=true
NEXT_PUBLIC_ENABLE_INVITE_REQUESTS=true
First-Time Setup Tasks
1. Create Admin User
After starting the app, create the first admin user:
# Navigate to admin setup
http://admin.localhost:3000/admin/setup
Or use API directly:
curl -X POST http://localhost:3000/api/admin/auth/create-first-admin \
  -H "Content-Type: application/json" \
  -d '{
    "email": "admin@example.com",
    "password": "your-strong-password",
    "fullName": "Admin User"
  }'
⚠️ Important: This endpoint only works if no admin users exist!
2. Set Up Admin 2FA (Recommended)
- Log in to admin dashboard
- Go to Settings → Security
- Click "Enable Two-Factor Authentication"
- Scan QR code with authenticator app (Google Authenticator, Authy, etc.)
- Enter verification code
- Save backup codes in a secure location
3. Create Invite Codes
To allow users to sign up:
- Log in to admin dashboard
- Go to Invites → Create
- Set:
- Expiration date
- Max uses (e.g., 1 for single-use, 100 for multi-use)
- Copy the generated code
- Share with users
4. Test User Signup
- Go to
http://finance.localhost:3000/finance/login - Click "Sign Up"
- Enter email, password, name, and invite code
- Verify account creation in admin dashboard
5. Connect Test Bank Account
- Log in as test user
- Click "Connect Bank Account"
- Search for "Plaid Sandbox"
- Use credentials:
user_good/pass_good - Select accounts to link
- Verify accounts appear in dashboard
Development Workflow
Running the App
# Development server with Turbopack
npm run dev

# Production build
npm run build

# Start production server
npm start

# Lint code
npm run lint
Testing Subdomains Locally
The app uses subdomain routing. To test locally:
-
Use
.localhostdomains (works natively):http://localhost:3000- Main portfoliohttp://finance.localhost:3000- Finance apphttp://admin.localhost:3000- Admin dashboard
-
Or edit hosts file (alternative):
# Windows: C:\Windows\System32\drivers\etc\hosts
# Mac/Linux: /etc/hosts

127.0.0.1 finance.localhost
127.0.0.1 admin.localhost
Common Development Commands
# Install new dependency
npm install package-name

# Install dev dependency
npm install -D package-name

# Update dependencies
npm update

# Check for outdated packages
npm outdated

# Clean install
rm -rf node_modules package-lock.json
npm install
Project Structure Navigation
app/
├── finance/          # Finance app pages
│   ├── page.tsx     # Dashboard
│   ├── accounts/    # Account management
│   ├── transactions/# Transaction history
│   └── budgets/     # Budget management
├── admin/           # Admin dashboard
│   ├── page.tsx     # Admin home
│   ├── users/       # User management
│   └── invites/     # Invite management
└── api/             # API routes
    ├── plaid/       # Plaid integration
    ├── admin/       # Admin APIs
    └── transactions/# Transaction APIs
Troubleshooting
"Module not found" errors
# Clear Next.js cache and reinstall
rm -rf .next node_modules
npm install
npm run dev
"Invalid environment variable" errors
- Check
.envfile exists - Verify all required variables are set
- Ensure no extra spaces in values
- Restart dev server after changes
Supabase connection fails
- Verify
NEXT_PUBLIC_SUPABASE_URLis correct - Check
NEXT_PUBLIC_SUPABASE_ANON_KEYis the anon key (not service role) - Ensure Supabase project is active (not paused)
Plaid Link doesn't open
- Check
PLAID_CLIENT_IDandPLAID_SECRETare correct - Verify
PLAID_ENV=sandbox - Ensure redirect URIs are configured in Plaid Dashboard
- Check browser console for errors
Database migrations fail
- Run migrations in correct order
- Check for syntax errors in SQL
- Verify database password is correct
- Ensure you have sufficient permissions
Build fails with TypeScript errors
# Regenerate Supabase types
npx supabase gen types typescript --project-id your-project-id > types/supabase.ts

# Check types
npm run build
Next Steps
✅ You're all set! Here's what to explore next:
- Learn the Architecture - Read Architecture Overview
- Understand Authentication - See Authentication
- Explore APIs - Check API Reference
- Review Database - Study Database Schema
- Development Workflow - Follow Development Guide
Resources
Need help? Check the Troubleshooting Guide or open an issue on GitHub.